Running Pester Tests Against Citrix NetScaler
Pester is a testing framework that runs from Microsoft PowerShell allowing for quick test creation for a variety of usecases. During a recent customer network upgrade I found Pester to be a great tool to validate Netscaler funtionality post-upgrade and thought I would create a simple healthcheck to share with the community. In this post i’ll cover getting started with a handful of simple Pester tests that you can use or modify for your environment.

PowerShell Module Install
Note: This guide assumes you are running PowerShell 5.0 or greater that can use PSGallery to download new modules. If an older version is used the modules will need to be downloaded and imported manually.
Pester
Let’s start by installing the needed Pester PowerShell module.
find-module pester
install-module pester
install-module pester -scope currentuser (if not admin)
You’ll want version 4.0.8 or greater for this guide. If you prefer to save the module run.
save-module pester -path "C:\mypath"
import-module -path "C:\mypath\Pester\4.0.8\Pester.psm1"
Netscaler
There are multiple SDKs utilizing the Netscaler Nitro API to chose from and for this guide I used an awesome project by Brandon Olin simply called Netscaler available on PSGallery.
find-module netscaler
install-module netscaler
install-module netscaler -scope currentuser (if not admin)
If you prefer to save the module run.
save-module netscaler -path "C:\mypath"
import-module -path "C:\mypath\NS-Validate\NetScaler\1.6.0\NetScaler.psm1"
Download Sample Pester Tests
The tests I created are out on Github and available the following methods.
If you have Git installed the easiest method would be to clone the repository.
git clone https://github.com/ryancbutler/ns-pester.git
If you prefer to download the files instead you can grab them here.
What do the tests do?
Pester tests are simply PowerShell scripts that run test logic and stored in a folder called tests. You’ll want to make sure the word tests is contained in the ps1 filename name so Pester can pick it up (eg mytests.tests.ps1). Within the downloaded files you’ll see four separate test files with each file containing either a single or multiple tests.
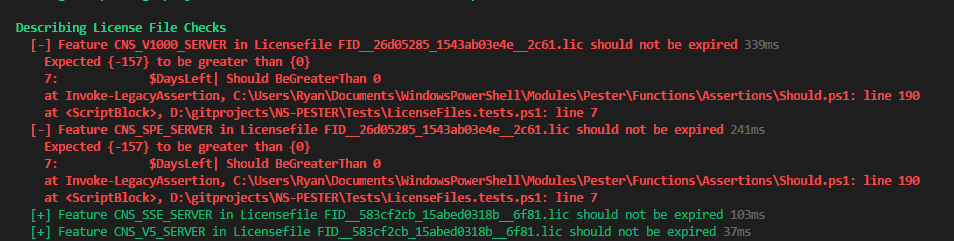
LicenseFiles.tests.ps1
This test will use the Netscaler module to look at the installed license files and test each one to make sure they are not expired.

If an expired file is found the test will fail.
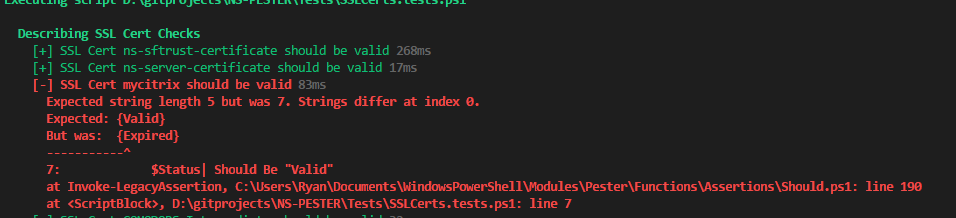
SSLCerts.tests.ps1
This test will use the Netscaler module to look at all SSL certificates installed and check each one for expiration. If the certificate does not come back as “Valid” the test will fail.
VIPS.tests.ps1
This test will use the Netscaler module to look at all Netscaler Gateway, Load Balancer and Content Switch vservers installed and check status for each.

If the VIP does not report as up the test will fail.

dns.tests.ps1
The thought behind this test is to run against Netscaler ADNS servers to make sure GSLB is pointing to the correct servers in Active\Passive environments. The test contains both nameservers that should reflect the ADNS servers along with records that should be checked. This test uses the builtin resolve-dnsname to grab the record information. If the returned IP does not reflect the expected IP the test will fail.

Running the Pester tests
To run the tests simply edit the start.ps1 with the appropriate Netscaler login information and run.
.\start.ps1
Pester will scan the tests folder and run all tests found within the folder.
Wrap-Up
Hopefully this guide and examples show you the possibilities of running Pester against a Netscaler environment. If you have any test ideas or questions please feel free to leave a comment below.
Leave a comment